Holiday Rotations Assignment Configuration
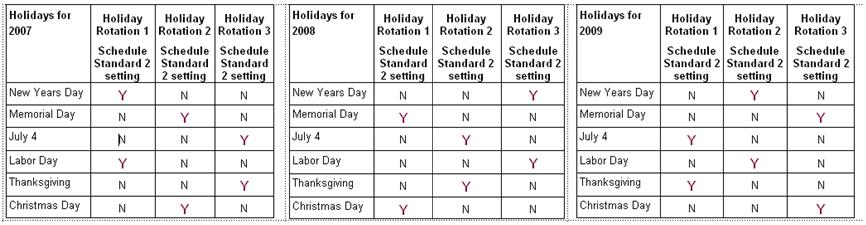
In the Holiday Rotations assignment, specific holidays are eligible to be worked by certain employees. For example, Holiday 1 rotation employees can work New Year's Day and Labor Day, Holiday 2 rotation employees can work Memorial Day and Christmas, and Holiday 3 rotation employees can work July 4 and Thanksgiving. Each year, the eligible holidays to work for each assignment can be changed.
To set up a Holiday Rotations assignment, a separate assignment needs to be set up for each holiday rotation. For example, if there are three separate holiday rotations for an organization unit, then three separate assignments would need to set up (in the example below, these are called Holiday Rotation 1, Holiday Rotation 2 and Holiday Rotation 3). For each assignment, select a holiday record for EACH holiday, making sure to select the correct holiday that is either set up as Working or Not Working for that assignment rotation.
The recommended way to indicate which employees belong to each rotation is to use assignment codes. These are established on the Assignment Codes screen. The following is an example of suggested configuration for setting up a holiday for three separate rotations.
Steps to Create the Holiday Rotation Assignment
The following summarizes the steps to create a Holiday Rotation assignment. These steps are described in more detail below.
Step 1: Set up the Assignment Source with a Criteria option to identify employees in the assignment
Step 2: Create criteria codes to identify employees for each rotation
Step 3: Create two Holiday records for each holiday, one set to work, one set to not work
Tip: To copy all general, indicator, and parameter attributes of an existing Holiday record, and save on setup time, use the Replicate feature. Open an existing record, and in the Actions section in the left pane, click the Replicate button.
- Set up the Holiday General Tab
- Set up the Holiday Indicators Tab
- Set up the Holiday Parameters Tab
Step 4: Create new Assignment Code records for each rotation
- Set up the Assignment Code General Tab
- Set up the Assignment Code Indicators Tab
- Set up the Assignment Code Parameters Tab
- Set up the Assignment Code Criteria Screen
- Set up the Assignment Code Holidays Screen
Step 5: Add the appropriate assignment criteria to each employee record
Step 6: Enter the employee Holiday Shift Eligibility Date, if applicable.
Step 7: Add the holiday validation to the Selection Styles
Step 1: Set up the Assignment Source Criteria option
This step allows the user to select certain fields as criteria to specify which employees belong to a certain holiday rotation. For example, you might be adding the Grade criteria. Then you can create separate grade records (rotation 1, rotation 2, rotation 3) and assign these grade records to the employee.
- From the Configuration section>Assignment card, open the Assignment Source screen.
- From the search screen, enter Holiday in the Code field and click on the Search button.
- Select the record with the Holiday description.
- Click on the Assignment Determination button in the left pane.
- From the Available Criteria Items listing, find a criteria combination that will uniquely identify this assignment.
- Note: With Holiday Rotations it is best to use a Labor Distribution option that is not used in any other processing--for example, the Grade, Labor Group, or Seniority option.
- Drag the criteria selection from the Available Criteria Items column on the left to the Assigned Criteria Items column on the right.
- Drag the criteria selection up in the hierarchy on the Assigned Criteria Items field so that it supersedes other criteria.
- Click on the Save button at the bottom of the screen to save the record.
Step 2: Create criteria codes to identify employees for each rotation
Create as many criteria records as there are rotations. For example, if there are three different groups in the holiday rotation, create three different records.
- From the Configuration section>Labor Distribution section, select the appropriate screen.
- Click on the Add button in the left pane to add a new record.
- In the Code field, enter a code that describes this holiday rotation.
- Enter a Description to describe this record (for example, Holiday 1 Rotation, Holiday 2 Rotation, and Holiday 3 Rotation).
- Let the Active field default to Yes. The organization unit is automatically filled in.
- Click on the Save button at the bottom of the screen to save the record.
- Repeat steps 2-6, one for each rotation (If there are three rotations, set up three criteria records; if there are four rotations, set up need four criteria records).
Step 3A: Set up the Holiday Codes General Screen
Note: Since holidays by default are set to Y, if there are holidays already set up in the Holiday table, they can be used by this assignment for the WORKED holiday. If holidays are not already set up, set up two records for each holiday—one set to WORK and one set to NOT WORK.
- Open the Assignment Codes table from the Configuration section>Assignment card>Holiday screen.
- Click on the Add button to create a new record.
- Enter a
 Code and Description that will identify this holiday--indicating that it is "Not Worked", if applicable.
The label describing this holiday code.
The unique short name or abbreviation identifying this holiday.
- Enter the Actual Date of the holiday and the Observed Date when it is observed in the corporation.
The date the holiday is recognized and celebrated within the corporation.
The calendar date the holiday actually occurs. Note: The holiday time frame starting and ending date/time for scheduling is set up on the Parameters tab>Schedule Process card.
- Enter the Holiday Category Code. This field is used with the Every Other Same holiday assignment because there may be more than one "Holiday" record for the same holiday.
This code is used with the Every Other Same Holiday rule to determine whether the same holiday was worked in the previous year. This is also the code that displays in the cell header on the schedule grid.
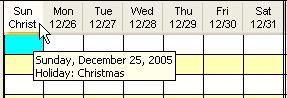
Note: Depending on the sizing of the schedule cells, only part of the description may be visible. Hover the cursor over the header to display the Holiday Description.
Multiple holiday records can be assigned to the same holiday category. For example there might be three different holiday codes and time frames for the Christmas holiday. Each of these could be assigned the Christmas holiday category.
- Click on the Save button at the bottom of the screen to save the record.
Step 3B: Set up the Holiday Indicators Tab
- Select the Indicators tab.
- For this holiday rule, Holiday Indicator Schedule Standard 1 is not used, and the default setting can be left.
Holiday Indicator Schedule Standard 1 determines whether this holiday is a major or minor holiday. This is used with holiday rules which track some holidays differently than other holidays. For example, an organization unit might consider Major holidays to be Thanksgiving, Christmas and New Year's Day and minor holidays to be Memorial Day, Independence Day, and Labor Day. The rotations for major and minor holidays can be set up differently.
Note: If all holidays are included in the same rotation, all the holidays can be left with the default setting of A.
Valid Indicator Options:
A
|
This holiday is a major holiday.
|
B
|
This holiday is a minor holiday.
|
Note: This indicator is found in the Configuration section>Assignments card>Holiday screen>Indicator tab>Schedule Process card.
- For this holiday rule, each holiday should have two records: One record should have Holiday Indicator Schedule Standard 2 set to Y and the matching holiday record should have this indicator set to N.
Holiday Indicator Schedule Standard 2 is used to indicate whether this holiday is to be populated as part of the Holiday Rotations Rule. This indicator is only used in the Holiday Rotations Rule, with holiday assignments where Holiday Assignment Code Indicator Schedule Standard 8 is set to Y.
Holiday Assignment Code Indicator Schedule Standard 8 determines whether this assignment uses the Holiday Rotations Rule.
In the Holiday Rotations assignment, specific holidays are eligible to be worked by certain employees. For example, Holiday 1 rotation employees can work New Year's Day and July 4; Holiday 2 rotation employees can work Memorial Day and Thanksgiving and Holiday 3 rotation employees can work Labor Day and Christmas. Each year the eligible holidays to work for each assignment can be changed.
Valid Indicator Options:
N
|
This assignment does not use the Holiday Rotation processing.
|
Y
|
This assignment does use the Holiday Rotation processing.
|
Note: This indicator is found in the Configuration section>Assignments card>Assignment Code screen>Indicators tab>Schedule Process card.
With this assignment, there must be two records for each holiday--one with this indicator set to Y and one with this indicator set to N. One rotation will include the holiday with the indicator set to Y and the other rotations will include the holiday with the indicator set to N.
For more information on setting up this rule, see the section in this document on Holiday Rotations Assignment Configuration.
Valid Indicator Options:
N
|
This holiday is not included in this holiday rotations assignment.
|
Y
|
This holiday is included in this holiday rotations assignment.
|
Note: This indicator is found in the Configuration section>Assignments card>Holiday screen>Indicator tab>Schedule Process card.
- Click on the Save button at the bottom of the screen to save the record.
Note: When the Assignment is being created, the correct holiday (Y/N--worked or not worked) needs to be selected from the Holiday section screen.
Step 3C: Set up the Holiday Parameters Tab
- Select the Parameters tab and open the Schedule Process card by clicking on the card arrow.
- Enter the parameter option values to set the start date/time and the end date/time for the holiday for this assignment.
- Enter the parameter option values to set the start date/time and the end date/time for the holiday for this assignment.
- In the Holiday Parameter Schedule Standard Date 1 field, enter the starting date of the holiday. The holiday time frame begins on this date on the time defined by Holiday Parameter Schedule Standard Time 1.
Holiday Parameter Schedule Standard Date 1 determines the starting date of the holiday. The holiday time frame begins on the date entered here, on the time defined by Holiday Parameter Schedule Standard Time 1.
Valid Values: Any valid, properly formatted date.
Note: This parameter is found in the Configuration section>Assignments card>Holiday screen>Parameter tab>Schedule Process card.
- In the Holiday Parameter Schedule Standard Date 2 field, enter the ending date of the holiday. The holiday time frame ends on this date on the time defined by Holiday Parameter Schedule Standard Time 2.
Holiday Parameter Schedule Standard Date 2 determines the ending date of the holiday. The holiday time frame ends on the date entered here, on the time defined by Holiday Parameter Schedule Standard Time 2.
Valid Values: Any valid date.
Note: This parameter is found in the Configuration section>Assignments card>Holiday screen>Parameter tab>Schedule Process card.
- In the Holiday Parameter Schedule Standard Time 1 enter the time the holiday begins on the starting date, defined by Holiday Parameter Schedule Standard Date 1.
Holiday Parameter Schedule Standard Time 1 determines the starting time of the holiday. The holiday time frame begins on the time entered here, on the date defined by Holiday Parameter Schedule Standard Date 1.
Valid Values: Any valid time, expressed in 24-hour format.
Note: This parameter is found in the Configuration section>Assignments card>Holiday screen>Parameter tab>Schedule Process card.
- In the Holiday Parameter Schedule Standard Time 2 enter the time the holiday ends on the ending date, defined by Holiday Parameter Schedule Standard Date 2.
Holiday Parameter Schedule Standard Time 2 determines the starting time of the holiday. The holiday time frame begins on the time entered here, on the date defined by Holiday Parameter Schedule Standard Date 2.
Valid Values: Any valid time, expressed in 24-hour format.
Note: This parameter is found in the Configuration section>Assignments card>Holiday screen>Parameter tab>Schedule Process card.
- Click on the Save button at the bottom of the screen to save all indicator and parameter values.
Step 4A: Set up the Assignment Code General tab
- From the Configuration section>Assignment card, open the Assignment Code screen.
- Click on the Add button in the left pane to open a screen to create a new record.
- Enter the date this Assignment Code will be effective.
- Select the Standard option from the Assignment Source Classification field.
The system classification of the assignment source record (Standard, Customer, User-Defined, or Replicated). After entering the Assignment Source Classification, Assignment Source options with the selected classification are listed in the Field Look Up Values.
- In the Assignment Source Code field, select Holiday from the field look up values.
The short name or abbreviation for the assignment source that relates to this record. These codes are previously set up on the Configuration section > Assignment card > Assignment Source screen.
Note: There are many standard assignment source codes that match the rule being validated. Additional replicated or user defined codes can be added.
- For each holiday rotation, create a separate Code with a unique name.
The alphanumeric short name or abbreviation identifying this assignment.
- Enter a Description to identify this holiday assignment record.
The label describing this assignment code.
- Click on the Save button at the bottom of the screen to save the record.
Step 4B: Set up the Assignment Codes Indicators Tab
To set up the Assignment Codes Indicators tab, complete the following steps:
- From the Configuration section>Assignment card, Assignment Code screen, search for and open the record to be set up.
- Click on the Indicators tab, then open the Schedule Process card.
- Set Holiday Assignment Code Indicator Schedule Standard 1 to Y to process this assignment using holiday rules.
- Set Holiday Assignment Code Indicator Schedule Standard 2 to the proper option of how holiday shifts are determined.
Holiday Assignment Code Indicator Schedule Standard 2 indicates the method of how an employee schedule is determined to be a holiday schedule.
Valid Indicator Options:
H
|
Holiday schedules are determined by hours within the holiday date/time range.
For example, if this field is set to 2, an employee's schedule must have at least two hours scheduled within the holiday date/time range to be considered a holiday schedule.
Note: The number of hours for this indicator is set up on Holiday Assignment Code Parameter Schedule Standard Hour 1.
|
P
|
Holiday schedules are determined by percentage of the shift within the holiday date/time range.
The system compares the total length of the schedule with the amount of time that falls within the holiday time frame. For example: An employee works an 8-hour schedule, and 2 hours falls within the holiday time frame. If the percentage value were set to 50%, the schedule would not qualify as a holiday schedule because only 25% of the time falls within the holiday time frame.
Note: The percentage for this indicator is set up on Holiday Assignment Code Parameter Schedule Standard Percent 1.
|
S
|
Holiday schedules are determined by start time.
If the start time of an employee's schedule falls within the time frame of the holiday (as defined by the starting and ending dates/times of the holiday), it is a holiday schedule.
Note: The starting and ending dates/times of the holiday are set up on the Holiday screen, on the Parameters tab: Holiday Schedule Standard Date 1 and 2 and Holiday Schedule Standard Time 1 and 2.
|
Note: This indicator is found in the Configuration section>Assignments card>Assignment Code screen>Indicators tab>Schedule Process card.
- If this indicator is set to H (hours in holiday), also configure the Holiday Assignment Code Parameter Schedule Standard Hour 1 to indicate the minimum hours that must be in the holiday time frame to consider a shift a holiday shift.
Holiday Assignment Code Parameter Schedule Standard Hour 1 indicates the minimum number of hours that must be included in a schedule for that schedule to be classified as a Holiday schedule.
For example, if this value is set to 2, there must be two or more hours of an employee schedule that falls within the holiday time frame, as determined by the Start Date/Start Time and End Date/End Time settings.
This value is used if a Holiday schedule is determined by minimum hours, when Holiday Assignment Code Indicator Schedule Standard 2 is set to H.
Valid Values:
Any numeric value
- If this indicator is set to P (percentage of shift in holiday), also configure the Holiday Assignment Code Parameter Schedule Standard Percent 1 to indicate the minimum percentage of a shift that must be in the holiday time frame to consider it a holiday shift.
Holiday Assignment Code Parameter Schedule Standard Percent 1 indicates the minimum percentage of a schedule that must fall within a Holiday time frame for that schedule to be classified as a Holiday schedule.
For example, when this value is set to 50, then fifty percent or more of a schedule must fall within the Holiday time frame. In this example, if an employee works an 8-hour schedule, then 4 or more hours must occur within the Start Date/Start Time and End Date/End Time settings.
This value is used if a Holiday schedule is determined by minimum hours, when Holiday Assignment Code Indicator Schedule Standard 2 is set to H.
Valid Values:
Any numeric value
- If this indicator is set to S (start time), the start time is set up on the Holiday record.
- Set Holiday Assignment Code Indicator Schedule Standard 3 to N.
Holiday Assignment Code Indicator Schedule Standard 3 determines whether the Every Other Holiday rule should be activated for this assignment.
Valid Indicator Options:
N
|
The Every Other Holiday rule is not processed with this assignment when scheduling.
|
Y
|
The Every Other Holiday rule is processed with this assignment when scheduling.
|
Note: This indicator is found in the Configuration section>Assignments card>Assignment Code screen>Indicators tab>Schedule Process card.
- Set Holiday Assignment Code Indicator Schedule Standard 4 to N.
Holiday Assignment Code Indicator Schedule Standard 4 determines whether the X out of Y Holiday rule should be validated with this assignment. When this rule is activated, employees are eligible to work X out of Y holidays, for example, 2 out of 4 holidays, or 1 out of 3 holidays.
Valid Indicator Options:
N
|
The X out of Y Holiday rule is not processed with this assignment when scheduling.
|
Y
|
The X out of Y Holiday rule is processed with this assignment when scheduling.
|
When this value is set to Y, also configure the values of X on Holiday Assignment Code Parameter Schedule Standard Integer 5 and the value of Y on Holiday Assignment Code Parameter Schedule Standard Integer 4.
Note: This indicator is found in the Configuration section>Assignments card>Assignment Code screen>Indicators tab>Schedule Process card.
- Set Holiday Assignment Code Indicator Schedule Standard 5 to the proper option to determine if there is a maximum number of schedules that an employee is eligible to work during the holiday time frame.
Holiday Assignment Code Indicator Schedule Standard 5 indicates if there is a maximum number of schedules that an employee is eligible to work during the holiday time frame.
Valid Indicator Options:
N
|
This rule is not processed for this assignment. There is no limit to the number of schedules an employee can work during the holiday time frame.
|
Y
|
This rule is processed for this assignment and there is a limit to the number of schedules an employee can work during the holiday time frame.
|
If this indicator is set to Y (Yes), also configure Assignment Code Parameter Schedule Standard Integer 1 to indicate the maximum number of schedules that an employee can work.
Note: This indicator is found in the Configuration section>Assignments card>Assignment Code screen>Indicators tab>Schedule Process card.
- If this indicator is set to Y (Yes), also configure Assignment Code Parameter Schedule Standard Integer 1 to indicate the maximum number of schedules that an employee can work.
Holiday Assignment Code Parameter Schedule Standard Integer 1 is used to indicate the maximum number of schedules that an employee can work within the holiday time frame. For example, if this value is set to 2, employees can be scheduled a maximum of 2 schedules within the holiday time frame (as set up on the Holiday Parameters screen.)
This parameter setting is only used when Holiday Assignment Code Indicator Schedule Standard 5 is set to Y.
Valid values:
Any numeric value
Note: This parameter can be found on the Configuration section>Assignment section>Assignment Codes screen on the Parameters tab.
- If this indicator is set to N (No), there is no limit to the number of schedules an employee can work during the holiday time frame.
- Set Holiday Assignment Code Indicator Schedule Standard 6 to N.
Holiday Assignment Code Indicator Schedule Standard 6 determines whether the Every Other Same Holiday rule should be activated for this assignment. When this rule is activated, employees who work a certain holiday one year are not eligible to work a holiday with the same Holiday Category the next year.
Valid Indicator Options:
N
|
The Every Other Same Holiday rule is not processed with this assignment when scheduling.
|
Y
|
The Every Other Same Holiday rule is processed with this assignment when scheduling.
|
Note: This indicator is found in the Configuration section>Assignments card>Assignment Code screen>Indicators tab>Schedule Process card.
- Set Holiday Assignment Code Indicator Schedule Standard 7 to N.
Holiday Assignment Code Indicator Schedule Standard 7 determines whether the Maximum Holidays Worked in a Calendar Year rule should be activated for this assignment. When this rule is activated, employees are eligible to work a certain number of holidays within a specified number of years, for example, 7 holidays in 2 years.
Valid Options:
N
|
The Maximum Holidays Worked in a Calendar Year rule is not processed with this assignment when scheduling.
|
Y
|
The Maximum Holidays Worked in a Calendar Year rule is processed with this assignment when scheduling.
|
When this indicator is set to Y, also configure Assignment Code Parameter Schedule Standard Integer 2 to indicate the number of years that are tracked (2 in this example) and Assignment Code Parameter Schedule Standard Integer 3 to indicate the number of holidays that must be worked within these number of years (7 in this example).
Note: This indicator can be found in the Configuration section>Assignments card>Assignment Codes screen>Indicators tab.
- Set Holiday Assignment Code Indicator Schedule Standard 8 to N.
Holiday Assignment Code Indicator Schedule Standard 8 determines whether this assignment uses the Holiday Rotations Rule.
In the Holiday Rotations assignment, specific holidays are eligible to be worked by certain employees. For example, Holiday 1 rotation employees can work New Year's Day and July 4; Holiday 2 rotation employees can work Memorial Day and Thanksgiving and Holiday 3 rotation employees can work Labor Day and Christmas. Each year the eligible holidays to work for each assignment can be changed.
Valid Indicator Options:
N
|
This assignment does not use the Holiday Rotation processing.
|
Y
|
This assignment does use the Holiday Rotation processing.
|
Note: This indicator is found in the Configuration section>Assignments card>Assignment Code screen>Indicators tab>Schedule Process card.
- Set Holiday Assignment Code Schedule Standard 9 to the proper option to determine if productive core rotating schedules should be populated on holidays if the employee is eligible to work.
Holiday Assignment Code Indicator Schedule Standard 3 determines whether employees productive core schedules should be populated as usual on holidays.
- If core schedules are set to populate, employees will be given their regular core schedule on holidays they are eligible to work, depending on the holiday rule selected.
- If core schedules are not set to populate, need-based scheduling is used. Employee may or may not be scheduled to work on their eligible holidays, depending on the staffing needs.
Valid Indicator Options:
N
|
Core productive schedules should not be populated on holidays. Core non-productive schedules are populated.
|
Y
|
Core productive schedules should be populated on holidays.
|
Note: This indicator is found in the Configuration section>Assignments card>Assignment Code screen>Indicators tab>Schedule Process card.
- If this indicator is set to Y (Yes) employees are scheduled their core schedules if they are eligible to work
- If this indicator is set to N (No) employees are not given their core schedules on any holiday. Note: Employees can still be assigned a need-based schedule on holidays they are eligible to work.
- Click on the Save button to save the record.
- Click on the Parameters tab to set up the companion parameters.
Step 4C: Set up the Assignment Code Parameters Tab
To set up the Assignment Codes Parameter tab, complete the following steps:
- Select the Parameters tab, then open the Schedule Process card.
- Depending on the setting of Holiday Assignment Code Indicator Schedule Standard 2, set the companion parameter to indicate how holiday shifts are determined.
Holiday Assignment Code Indicator Schedule Standard 2 indicates the method of how an employee schedule is determined to be a holiday schedule.
Valid Indicator Options:
H
|
Holiday schedules are determined by hours within the holiday date/time range.
For example, if this field is set to 2, an employee's schedule must have at least two hours scheduled within the holiday date/time range to be considered a holiday schedule.
Note: The number of hours for this indicator is set up on Holiday Assignment Code Parameter Schedule Standard Hour 1.
|
P
|
Holiday schedules are determined by percentage of the shift within the holiday date/time range.
The system compares the total length of the schedule with the amount of time that falls within the holiday time frame. For example: An employee works an 8-hour schedule, and 2 hours falls within the holiday time frame. If the percentage value were set to 50%, the schedule would not qualify as a holiday schedule because only 25% of the time falls within the holiday time frame.
Note: The percentage for this indicator is set up on Holiday Assignment Code Parameter Schedule Standard Percent 1.
|
S
|
Holiday schedules are determined by start time.
If the start time of an employee's schedule falls within the time frame of the holiday (as defined by the starting and ending dates/times of the holiday), it is a holiday schedule.
Note: The starting and ending dates/times of the holiday are set up on the Holiday screen, on the Parameters tab: Holiday Schedule Standard Date 1 and 2 and Holiday Schedule Standard Time 1 and 2.
|
Note: This indicator is found in the Configuration section>Assignments card>Assignment Code screen>Indicators tab>Schedule Process card.
- If this indicator is set to H (hours in holiday), also configure the Holiday Assignment Code Parameter Schedule Standard Hour 1 to indicate the minimum hours of an employee schedule that must be in the holiday time frame to consider it a holiday schedule.
Holiday Assignment Code Parameter Schedule Standard Hour 1 indicates the minimum number of hours that must be included in a schedule for that schedule to be classified as a Holiday schedule.
For example, if this value is set to 2, there must be two or more hours of an employee schedule that falls within the holiday time frame, as determined by the Start Date/Start Time and End Date/End Time settings.
This value is used if a Holiday schedule is determined by minimum hours, when Holiday Assignment Code Indicator Schedule Standard 2 is set to H.
Valid Values:
Any numeric value
- If this is set to P (percentage of shift in holiday), also configure the Holiday Assignment Code Parameter Schedule Standard Percent 1 to indicate the minimum percentage of an employee schedule that must be in the holiday time frame to consider it a holiday schedule.
Holiday Assignment Code Parameter Schedule Standard Percent 1 indicates the minimum percentage of a schedule that must fall within a Holiday time frame for that schedule to be classified as a Holiday schedule.
For example, when this value is set to 50, then fifty percent or more of a schedule must fall within the Holiday time frame. In this example, if an employee works an 8-hour schedule, then 4 or more hours must occur within the Start Date/Start Time and End Date/End Time settings.
This value is used if a Holiday schedule is determined by minimum hours, when Holiday Assignment Code Indicator Schedule Standard 2 is set to H.
Valid Values:
Any numeric value
- If this indicator is set to S (start time), the start time of the employee schedule must be within the holiday time frame to consider it a holiday schedule. The start date/time and ending date/time of the holiday time frame is set up on the Configuration section>Assignment card>Holidays screen>Parameters tab.
- Holiday Assignment Code Parameter Schedule Standard Integer 1 determines the maximum number of schedules that can be assigned to employees during a single holiday date range. If using this rule, enter a positive integer in this field.
Holiday Assignment Code Parameter Schedule Standard Integer 1 is used to indicate the maximum number of schedules that an employee can work within the holiday time frame. For example, if this value is set to 2, employees can be scheduled a maximum of 2 schedules within the holiday time frame (as set up on the Holiday Parameters screen.)
This parameter setting is only used when Holiday Assignment Code Indicator Schedule Standard 5 is set to Y.
Valid values:
Any numeric value
Note: This parameter can be found on the Configuration section>Assignment section>Assignment Codes screen on the Parameters tab.
- Holiday Assignment Code Parameter Schedule Standard Integers 2 - 5 are not used with this assignment and can be left blank.
- Click on the Save button at the bottom of the screen to save the record.
Step 4D: Set up the Assignment Codes Criteria Section
- Click on the Criteria button in the left pane.
- Click on the Add button to add a new criteria record.
- Enter an Effective Date, a Code and a Description that will identify this assignment rotation record.
The label describing this assignment code.
The alphanumeric short name or abbreviation identifying this assignment.
- Enter the additional required criteria information (for example the Grade Code used to differentiate between the holiday rotation records). Note: The field options that are displayed on this screen are selected on the Configuration section>Assignment card>Assignment Source screen. If additional fields are required, they must be added through that screen first. For more information, see the Assignment Source page.
- Click on the Save button at the bottom of the screen to save the record.
Step 4E: Select the Applicable Holidays on the Assignment Codes Holiday screen
The holidays that are included in this assignment are selected on the Holiday section screen.
To set up this screen, complete the following steps:
- With the Assignment Codes screen open, click on the Holiday section button in the left pane.
- Click on the Add button to open the Holiday Search screen. Enter search criteria to find holidays to include in this assignment.
- A listing of the holidays that have been previously set up on the Holiday screen is displayed. Check the box to the left of each holiday to be included in this assignment. Note: There may be more than one record for the same holiday. Be sure to correctly select the holidays to Work or Not Work.
Note: You must select an option for each observed holiday, whether it is worked or not worked. Otherwise, the system will schedule any unselected holidays as a regular working day.
Step 5: Add the appropriate assignment criteria to each employee record
- Open an employee master record and select the Labor Distribution screen.
- Select the Home Labor Distribution record.
- Enter the assignment criteria that will indicate which holiday rotation this employee belongs to.
Step 6: Enter the Employee Holiday Shift Eligibility Date
If an employee has a waiting period before he or she is eligible to participate in the Holiday assignment rules, an eligibility date can be entered in the employee record.
Note: If the employee does not have a waiting period, this field can be left blank.
- From the Employee section, use the Employee Search feature to locate the employee record(s) to configure.
- Open the Employee General screen> Parameters tab>Schedule Process card.
- In the Employee Parameter Schedule Standard Date 2 field, enter the date when the employee is eligible to start the holiday rules.
Employee Parameter Schedule Standard Date 2 indicates the date when an employee becomes eligible to start holiday rotations. This parameter can be used if new employees are exempt from being scheduled for holidays during a probationary period.
Valid Values:
Any valid date.
- Click on the Save button at the bottom of the screen to save the record.
Step 7: Add the Holiday Validation to the Selection Style
The Holiday rule must be selected as a validation in each pass of the selection style.
- From the Configuration section>Scheduling card, select the Selection Styles page.
- Open the selection style being used with the automatic scheduling process and/or manual process.
- Open a scheduling pass.
- Point the cursor to the Holiday rule in the Available Rules column. Drag the rule to the Selected Rules column.
- Repeat steps 3-4 for each pass to be validated.
- Click on the Save button at the bottom of the screen to save the record.