Editing an Existing Schedule
An existing schedule can be edited by opening the Schedule Box and modifying the values of the schedule. Either a pending or published schedule can be modified.
The original information can be left, or replaced with different values. Values can either be typed in or click on the Look Up Values icon  to open a menu of valid options for the field.
To edit an existing schedule, complete the following steps:
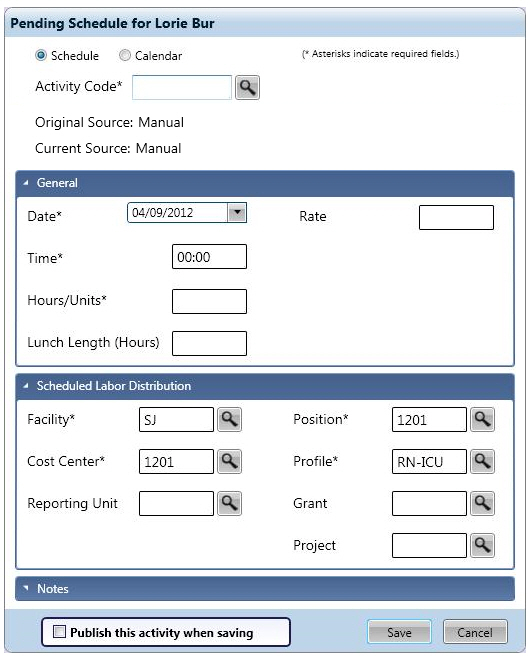
Position the cursor on the schedule box to be edited and double-click. The following screen is displayed.
Note: If any element (for example, Profile, Position, Activity Code, Organization Unit, or Job Class) has been set to Inactive since the schedule was initially created, another window appears explaining what has been made Inactive. Before saving, you will need to correct the inactive element by selecting an Active option.
- Select the option button to indicate this is for a schedule. The resulting screen determines the fields that are available for editing.
Tip: The Original Source and Current Source tell the history of the transaction entry by identifying the source of the original transaction (i.e. badge reader, manual, download, etc.) and the source of the last change.
- If the
 Activity Code is changed, the Time, Hours/Unit, and Lunch Length (Hours) fields default to the values of the related activity code.
The length of the lunch break, expressed in whole and/or decimal hours. For example, a half hour lunch would be entered as .5. This information is automatically filled in when an activity code is assigned, but can be edited.
The number of hours assigned with this schedule. This information is automatically filled in when an activity code is assigned, but can be edited.
The time of day the schedule should begin on the assigned date. This value is automatically filled in with the start time of the assigned activity code, but can be edited.
The activity code to be assigned to the employee for this transaction. Note: The organization unit information must be completed before the activity code options display in the Field Look Up Values.
- The Rate field is blank and will use the employee's pay rate. If an employee has won a schedule incentive bid, the rate of the bid is displayed in this field.
The rate of pay for working the schedule assignment. If this field is left blank, the employee is paid his or her normal pay rate for the labor distribution assignment.
- If the Organization Unit is changed, the Position and Profile fields must be changed to values which exist in the updated organization unit.
The profile code to be assigned to the employee. The profile code includes the job class, the organization unit, and any station and skill requirements. Note: The position code must be entered before applicable profile options are displayed in the Field Look Up Values.
The labor distribution code that indicates the organization and job class assignment for the employee. Note: The organization unit information must be completed before the position code options display in the Field Look Up Values.
Select the appropriate code for this field. The number of organization unit levels available and the organization unit names displayed depend upon the corporate structure.
- The Grant and/or Project information can be updated.
The identification code of the applicable project.
The identification code of the grant related to this transaction, if applicable.
- To add or update a note to this schedule, click on the arrow to the left of the Notes bar to open the section.
- A Predefined Note Code can be selected to automatically load Subject and Body information.
The free-form text of the message. When a predefined note is selected, the text is automatically displayed. If the predefined note is set up to be editable, additional information can be entered in this field. If this is NOT a predefined note, type the message text in this field.
Indicates the topic of this notation. When the predefined note is configured to be editable, the subject entry can be modified.
Standardized text that can be attached to an employee transaction to give additional information.
Predefined notes may be editable. An example of an editable predefined note is for funeral leave, to indicate the name of the deceased and relationship to the employee.
- If this is a pending schedule, check the box to the left of Publish this activity when saving to automatically launch the publishing process for this schedule. If this schedule is already published, this box is not available.
- When all fields are complete, click on the Apply & Close button to save this schedule and close this box.
If an Inactive element has not been corrected, a window appears to alert you. Make the required correction before saving.