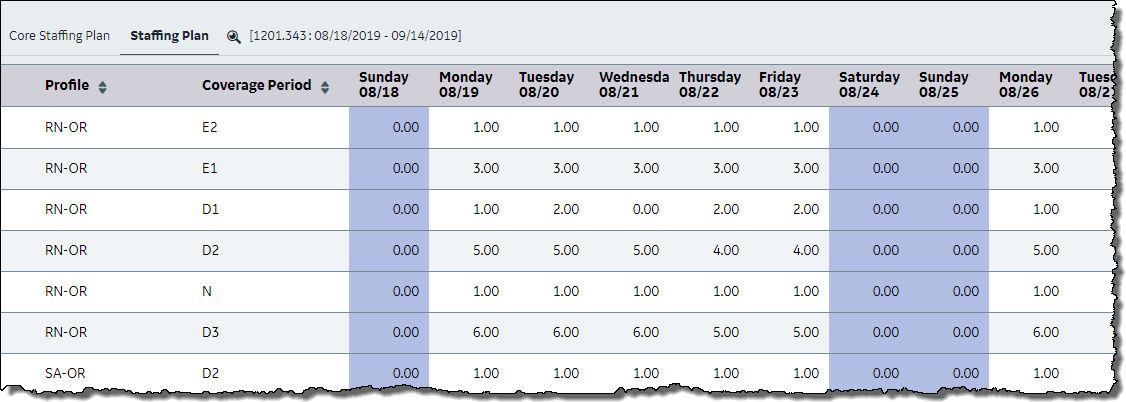
The Staffing Plan is the Staffing Template applied to a specific date range (such as a Schedule Period) and then adjusted for current conditions, such as high or low census.

The Staffing Template is set up first and indicates the baseline staffing levels needed for each organization unit. These staffing needs are set up for each combination of profile and coverage period. Once created, you use the Staffing Template to supply the initial data for the Staffing Plan, which uses the Staffing Template's needs as a starting point and then updates the needs based on current conditions.
Example:
Staffing Template: Generic need of four RNs every Monday for the Day coverage period
Staffing Plan: Need of three RNs on Monday, May 6, for the Day coverage period (adjusted down due to low census)
Note: Similar to the Staffing Plan, the Core Staffing Plan also defines staffing needs, but is set up using a combination of profiles and coverage periods, rather than profiles and activity codes. For more information, see Core Staffing Plan.
Manually apply a template to the Staffing Plan
An existing Staffing Template can be applied manually to the Staffing Plan. This depends on how an organization unit indicator is set. If set to apply a template automatically, you do not need to complete this section. For information about the organization unit indicator, see the "Set up staffing needs" section of Staffing Template.
Applying a Core Staffing Template manually can be done from two areas: Staffing Plan screen or Schedule screen.
Staffing Plan screen
To manually apply a Staffing Template to a Staffing Plan, complete the following steps.
The Staffing Template is applied. The template values are assigned to specific dates and replicated to fill the entire scheduling time frame. For example, if the Staffing Template was for two weeks, the template is replicated two times to create a four-week schedule, or replicated three times to fill a six-week schedule.
Schedule screen
To manually apply a Staffing Template from the Schedule, complete the following steps.
The Staffing Template is applied to the Schedule screen. The template values are assigned to specific dates and replicated to fill the entire scheduling time frame. For example, if the Staffing Template was for two weeks, the template is replicated two times to create a four-week schedule, or replicated three times to fill a six-week schedule.
Make changes to a Staffing Plan
To make changes to a Staffing Plan, complete the following steps.
The values can be modified to fit the scheduling needs of a particular scheduling time frame by adding or subtracting needs, profiles, and coverage periods. For example, if a holiday falls within a scheduling period, the staffing levels for that day may be adjusted without affecting the Staffing Template.
Staffing needs by coverage period versus activity code
On some screens, you can decide how you would prefer to view staffing needs: by coverage period or by activity code. This means that the needs are first established on a staffing template and then appear on the various screens broken down by either coverage period or activity code. Your scheduling practices determine whether an organization unit is set up to view needs by coverage period or by activity code.
The following example illustrates a key difference between the modes.
Assumptions for this example:
With the coverage period mode, a scheduled eight-hour activity code overlaps a coverage period perfectly. The needs on the screen are decreased by one during the coverage period, from four to three. But what happens with a 12-hour activity code? One coverage period's need is decreased by one (from four to three) because eight hours of the activity code overlap it. The remaining four hours are removed from the next coverage period. But since the next coverage period is also eight hours in length, the subtracted four hours leaves half of a need, or 3.5.
While simple situations like this can be managed, if you have several different activity codes scheduled with different start times and lengths, the staffing needs can get confusing. For example, you might see a need of 2.13.
With the activity code mode, the activity codes are shown on the screens instead of the coverage periods. The needs always appear as whole numbers even when they cross coverage periods, eliminating the decimal values that can cause confusion. Using the previous example, a scheduled 12-hour activity code reduces the activity code's need by one (from four to three), even though it crossed into a second coverage period.
The following table explains whether the Staffing Plan or Core Staffing Plan populates the staffing needs for each area of the system.
Area |
Staffing Plan |
Core Staffing Plan |
Balancing Grid on the Schedule screen |
Yes |
N/A |
Activity Balancing Grid on the Schedule screen |
N/A |
Yes |
Self Schedule screen* |
Yes* |
Yes* |
Current Staffing Overview, Monthly View, and productivity reports (to show budgeted needs and hours) |
Yes |
N/A |
*This is set with an organization unit indicator and an activity code indicator. See the "Set up staffing needs" section of Staffing Template.