![]()
![]()
![]()
![]()
|
|
|
|
|
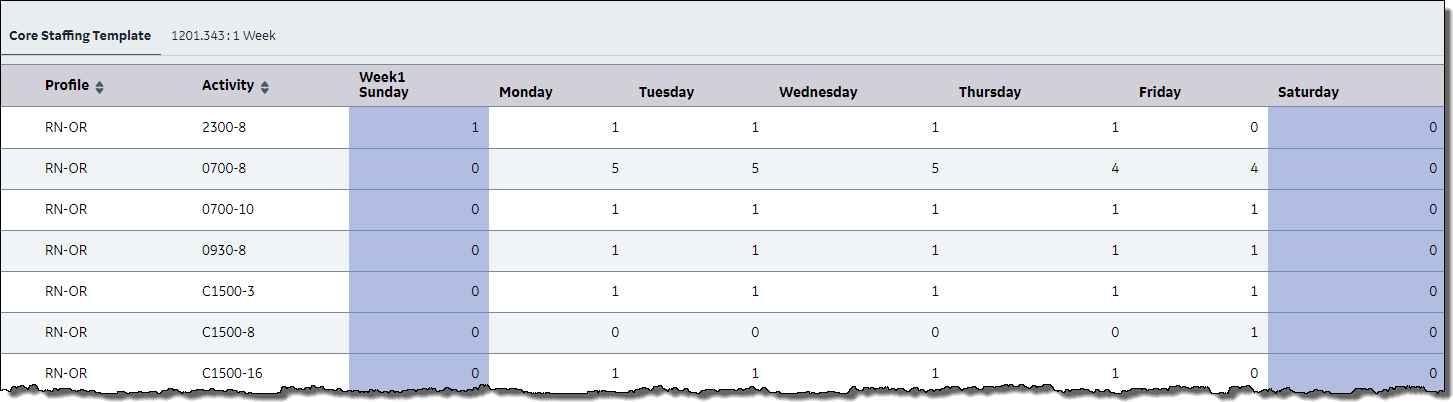
On the Core Staffing Template screen, you create templates that indicate the baseline staffing levels needed for each organization unit. These staffing needs are set up for each combination of profile and activity code. A Core Staffing Template states, for example, that the ICU needs seven RNs every Sunday for a 0700-12 activity code.
Once created, you use the Core Staffing Template to supply the initial data for the Core Staffing Plan, which uses the Core Staffing Template's needs as a starting point and then updates the needs based on current conditions, such as high or low census. For example, the Core Staffing Plan states that the ICU's census is low on Sunday, June 24, and only five RNs are needed instead of seven.
An organization unit can have multiple Core Staffing Templates to, for example, adjust for seasonal trends in staffing; however, only one template can be active at a time.
Note: Similar to the Core Staffing Template, the Staffing Template also defines staffing needs, but is set up using a combination of profiles and coverage periods, rather than profiles and activity codes. For more information, see Staffing Template.
Set up staffing needs
To configure how staffing needs should work for you, complete the following:
Organization Unit Indicators
To set the organization unit indicators, complete the following steps.
This indicator determines whether the Core Staffing Template is applied automatically or manually when first opening the Schedule screen for a new schedule period.
The advantage to applying it automatically is that you do not have to remember to apply a template manually every schedule period. The disadvantage is that templates will be applied when you first view a schedule period even if you do not want it to. For example, if you open the Schedule screen for a schedule period five years from now, the template will get applied. However, if in the meantime, there are changes in the organization unit, that template may no longer apply and there would be clean-up efforts to get it corrected.
This indicator only affects which mode the employees see on the Self Schedule screen.
For more information, see Concepts: Staffing needs by coverage period versus activity code below.
Activity Code Indicator
To set the activity code indicator, complete the following steps.
This indicator defines whether an activity code is available to employees for self scheduling and, if it is available, how the activity appears.
Core Staffing Template
See the remainder of this topic for instructions on adding a new Core Staffing Template.
Core Staffing Plan
Once the Core Staffing Template is added, use it to create the Core Staffing Plan. See Core Staffing Plan.
Add a new Core Staffing Template record
To add a new Core Staffing Template, complete the following steps.
In most cases, this staffing needs template is the same every week, and this value is set to 1. If alternating weeks in a schedule have different baseline staffing needs, this value can be set to 2 and the two weeks can be set up differently.
When a Core Staffing Template is assigned to a scheduling period, the system replicates this template to fill all weeks of the schedule period. For example, if the number of weeks is set to 1, when a four-week schedule period is opened, the system replicates this template four times to fill the four-week schedule period.
A grid appears for you to set up the staffing needs by profile and activity code for this organization unit and the number of weeks indicated.
You can change the profile or activity code by clicking in the appropriate field and making a selection.
Tip: You can select multiple rows by holding Ctrl or Shift while clicking.
Replicate an existing Core Staffing Template record
Instead of starting over and creating a new Core Staffing Template record, you can replicate (copy) an existing record. This allows you to start with a copy of a record and then make any needed changes. This is helpful if, for example, you make minor changes at a regular interval, such as an annual update. In addition, this allows you to retain past, inactive versions of the Core Staffing Template.
To replicate a Core Staffing Template, complete the following steps.
Copy a Core Staffing Template to a Staffing Template
If you add a Core Staffing Template, you can copy it to a Staffing Template. This saves you from having to create or update the Staffing Template manually.
Note: The organization unit needs to have a Staffing Configuration applied before copying the Core Staffing Template to the Staffing Template.
To copy a Core Staffing Template, complete the following steps.
If the organization unit already has a Staffing Template applied, a message appears asking whether you would like to override the original.
Once completed, the Staffing Template is applied.
Make changes to a Core Staffing Template
To make changes to a Core Staffing Template, complete the following steps.
The values can be modified by adding or subtracting needs, profiles, and activity codes.
Staffing needs by coverage period versus activity code
On some screens, you can decide how you would prefer to view staffing needs: by coverage period or by activity code. This means that the needs are first established on a staffing template and then appear on the various screens broken down by either coverage period or activity code. Your scheduling practices determine whether an organization unit is set up to view needs by coverage period or by activity code.
The following example illustrates a key difference between the modes.
Assumptions for this example:
With the coverage period mode, a scheduled eight-hour activity code overlaps a coverage period perfectly. The needs on the screen are decreased by one during the coverage period, from four to three. But what happens with a 12-hour activity code? One coverage period's need is decreased by one (from four to three) because eight hours of the activity code overlap it. The remaining four hours are removed from the next coverage period. But since the next coverage period is also eight hours in length, the subtracted four hours leaves half of a need, or 3.5.
While simple situations like this can be managed, if you have several different activity codes scheduled with different start times and lengths, the staffing needs can get confusing. For example, you might see a need of 2.13.
With the activity code mode, the activity codes are shown on the screens instead of the coverage periods. The needs always appear as whole numbers even when they cross coverage periods, eliminating the decimal values that can cause confusion. Using the previous example, a scheduled 12-hour activity code reduces the activity code's need by one (from four to three), even though it crossed into a second coverage period.
The following table explains whether the Staffing Plan or Core Staffing Plan populates the staffing needs for each area of the system.
Area |
Staffing Plan |
Core Staffing Plan |
Balancing Grid on the Schedule screen |
Yes |
N/A |
Activity Balancing Grid on the Schedule screen |
N/A |
Yes |
Self Schedule screen* |
Yes* |
Yes* |
Current Staffing Overview, Monthly View, and productivity reports (to show budgeted needs and hours) |
Yes |
N/A |
*This is set with an organization unit indicator and an activity code indicator. See the "Set up staffing needs" section of Core Staffing Template.