![]()
![]()
![]()
![]()
|
|
|
|
|
There is an individual schedule cell for each day, for each employee. The schedule cells display the scheduled activities, unavailability, and education tracking classes for each day.
Scheduled Activity Boxes
The individual boxes within the schedule cells show the scheduled assignment for that day. The following may be displayed on a schedule
|
Published Schedule
|
Depending on the Style selected, a published schedule is either indicated by a bold border and font or by the activity box being filled in with the selected activity color. To change the style, go to the tool bar, then open the View menu, then the Style option. Select either the Transparent Style or the Solid Style. |
|
Pending Schedule |
The muted border and font indicate that this schedule is pending. |
|
Alternate Schedule |
The heavy border on the left side of the schedule box indicates the employee is scheduled in an organization that is not included in the open schedule screen. Hover the cursor over the schedule box to display a tool tip with the details about the schedule, including the organization unit and profile assignments. |
|
Highlighted Schedule |
The gold coloring indicates this schedule is highlighted. Schedules are selected for highlighting from the Tool Bar > View menu> Highlight> Activities, then choose the type of activities to be highlighted. |
|
Overtime Schedule |
The red background indicates that this schedule will cause the employee to incur overtime. If schedules are projected in the future, this gives the scheduler time to reschedule the employee before he/she actually incurs overtime. |
|
Cursor Focus on an Empty Cell |
The gold border indicates that the focus has been set on this empty cell. The focus can be set on multiple consecutive cells at the same time. |
|
Cursor Focus on a Filled Cell |
The gray border around the outside of the scheduled activity box indicates the focus is set on this cell. |
|
Calendar Entry |
The black, oval shaped icon indicates a calendar. The calendar code is displayed in the center. |
|
Education Tracking Class Instructor Approved Requested |
The gray, oval shaped icon indicates the employee is enrolled in an education tracking class on this day. ED is displayed on the icon. Hover the cursor over the icon to display a tool tip with information on the class. |
|
Extra Shift |
The Extra Shift indicator determines whether a shift is an extra shift or a regular shift. Note: The Extra Shift indicator is only displayed for pending/published schedules. |
|
Unavailability
|
The green bar indicates the employee has an unavailability request on the day(s) it is displayed. If there is a yellow star on the bar, this is a pending request. |
|
Recurring Unavailability
|
The green bar with a circling arrow indicates the employee has a recurring unavailability request on the day(s) it is displayed. If there is a yellow star on the bar, this is a pending request. |
|
Schedule Incentive Request |
This icon indicates that the employee has submitted a schedule incentive bid for the day. |
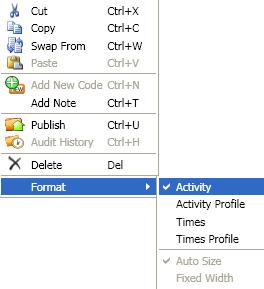
Formatting Options of Cells
The information that is displayed within the scheduled activity box can be formatted to display one of the following options. The following show the information that is displayed for the same schedule.
Note: The width of the cells can be changed so that all the selected information can display. If the cell width is set to Auto Width, the cell width will automatically adjust to display the widest cell on the grid.
Activity |
|
Shows the scheduled activity code only. |
Activity Profile
|
|
Shows the activity code and the profile of the schedule. |
Times |
|
Shows the starting and ending times of the schedule. |
Times Profile
|
|
Shows the starting and ending times and the profile of the schedule. |
Auto Sized |
|
The size of the schedule cells will adjust based on the length of the longest schedule box in the column. All the cells in the column will adjust to the same size. |
Fixed Width |
|
The size of the cell is set by dragging the edge of cell to the correct size, and then accessing the menu and selecting the Fixed Width option. |
To change the format of the cells or schedule boxes, complete the following steps:
Note: To set the column width to Fixed Width, first adjust the size of the cell by dragging the edges of the cell. Then follow steps 1-3 above.
